
Frisian ryebread is typical of the ryebreads of Northern Europe. The Danes introduced it to the British some 1500 years ago. Rye grows in the colder climates and used to be a poor man’s bread, yet a healthy one. It is thought this rye dough was placed in the early evening on a stove that was warm, but would not be fired anymore that day.
Taste and other characteristics of Frisian ryebread
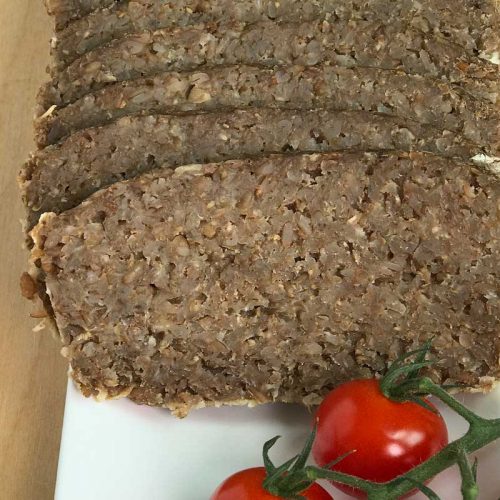
This rye bread is made of virtually 100% rye and it is not using the flour, but crushed whole rye berries. There is no fermentation in this bread. But since the amylases (ie the enzymes converting starch into sugars) in rye are much more heat resistant than those in wheat, this bread develops a wonderful fragrant aroma. And is rather sweet, dark and moist. It has a high fiber content and the release of its sugars in our blood is much slower than in white bread or rice (lower glycemic index). Since its high fiber content may cause bloating, the bread sometimes is baked with caraway seeds to counter that. The bread keeps well for a long time.
This Frisian ryebread is very simple to make, as long as you can manage without your oven for almost a full day!
Special equipment
- glass loaf pan or large rectangular terrine form
Frysian Ryebread
Ingredients
Ingredients
- 1 lb 12 oz (800 g) (organic) cracked rye
- 0.56 oz (16 g) salt
- 2 pints (1000 g) boiling water
- 1.8 oz (50 g) ground dark rye flour
- 1.8 oz (50 g) whole wheat flour
- preferably a glass loaf ‘pan’
Instructions
- Place 800 g cracked rye and the salt in an ordinary pan or heat resistant plastic container
- Bring the water to the boil and add it boiling hot to the cracked rye and mix. Immediately after mixing the temperature is around 66 C
- Mix more, cover and place it in an insulated box or wrap the pan with a thick towel or blanket. Let the mixture sit for 7 h, after which it will be noticeable that the mixture has become pretty sticky and flavorful. Then add the rye/wheat flour mixture, mix and form a loaf. The whole mixture is now pretty sticky
- Coat the loaf pan with vegetable oil and loosely dust with rolled oats or wheat germ
- Transfer the loaf shaped dough to the glass loaf pan and push the dough in the form tight and make the surface flat
- Cover the loaf pan with a lid or aluminum foil, but do not close hermetically. Place in the oven at 95-100 C in the presence of a bowl with water (to keep the oven moist)
- After 18 h (!) take the loaf pan out and let is cool down for a few hours
- Release the loaf carefully not to break it. To this purpose you can cut with a paring knife between the bread and the form, then place a cutting board on top of the form and turn it upside down. The bread will now release and positioned on the cutting board. Let it entirely cool down, loosely covered
- 9. After the loaf has completely cooled down, slice with a wet knife in thin, 0.16 inch (0.4 cm) slices
Notes
Remarks
- The salt load for this type of bread is relatively high. If you have concern for heart disease or high blood pressure, you may substitute by “Low salt”. Low salt is a mixture of 70% potassium chloride and 30% sodium chloride. Too much sodium contributes to high blood pressure.
Rye breads in general need more salt than wheat breads to have the right taste. - Using a traditional metal bread pan leads quickly to the release of the protective (non-stick) layer. Prolonged exposure to the heat and the dough mixture, renders both the bread and the breadpan then useless. Therefore, use a glass one.