
There is a key to making this crusty rustique ciabatta, white (wheat) bread taste well. you need to make half of the dough a day in advance and let it preferment. There are various opinions on the water to bread flour ratio in the preferment and in the total recipe, but keep it as wet as you can, as long as it still able to fold (see later). Also a high gluten bread flour is required to support the large holes that ciabatta is well known for. And finally baking the dough at high temperature helps the oven spring and crust formation. See for more background cooking hints: bread, dough, batter and noodles
Origin of crusty rustique ciabatta
This bread in the form of a slipper (ciabatta in Italian) is relatively new: it was first baked in 1982 by Arnaldo Cavallari, a baker in Verona, Italy as an alternative for French baguettes, which were used in Italy as sandwich bread at the time.
The art of making crusty rustique ciabatta
Fermentation with bakers yeast works best between 20 and 32 C. Within this range, higher temperatures promote faster fermentation. Having developed the recipe in my kitchen in Hong Kong, where kitchen temperature usually is 28 or 30 C, I always use a very tiny (maximum 0.1 g) amount of dry yeast in the pre-ferment. Thus yeast cells first have to multiply and grow before sufficient fermentation would appear. I leave the pre-ferment between 8-12 hrs at these temperatures, developing a yeasty flavor. Thus it is breaking down part of the bread proteins and starches into smaller fragments. Thereafter it is stored in the fridge overnight. This complex flour degradation is the base for the flavor developed in the final bread.
The other feature of making this bread is that it does not take a lot of work: it is more patience than effort.
Special equipment
- oven
- baking sheet
- plastic foil
Crusty, rustique ciabatta
Ingredients
Ingredients for the pre-ferment
- 12.3 oz (350 g) strong (Canadian) white bread flour protein content 14.9%
- 12.3 oz (350 g) water 25 C
- 0.004 oz (0.1 g) dried baker's yeast
Ingredients for the final dough
- All the pre-ferment
- 12.3 oz (350 g) strong (Canadian) white bread flour
- 9.7 oz (275 g) water 25 C
- 0.11 oz (3 g) dry baker's yeast
- 0.25 oz (7 g) salt
Instructions
Instructions for making the pre-ferment
- Mix the flour with the equal amount of weight of water in a large enough bowl
- Add the instant dry yeast
- When the mixture is well mixed it is covered, but such that air can still come in and interact with the mixture (as long as there is air, yeast cells also multiply; in the absence of air they only ferment sugars into alcohol and carbon dioxide)
- After 4 hours or so, fermentation becomes visible from small bubbles. Let it ferment at room temperature for another 8 h
- Thereafter either use it for the final dough or place in the refrigerator overnight for 8-12 h to manage your time and develop more flavor
Instructions to make the bread
- If the preferment was placed in the refrigerator for 8-14 h, take it out and let it warm up for an hour
- Add the flour to the mixture, together with the water, dried yeast and salt. Then mix again with a fork in the same manner as described before, until we have a smooth but very wet dough. You cannot knead this though, only fold. The gluten develops while stretching and folding
- Let the mixture ferment further on the counter that is lightly dusted with flour, and then covered with plastic wrap that has been coated with a thin vegetable oil layer on one side, so it does not stick to the dough. The wrap prevents the dough surface from drying out (this is most important in low humidity environments)
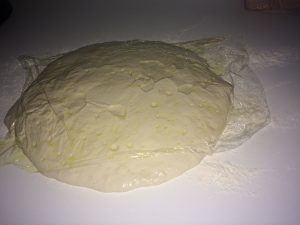
- After 1 hr, we use a spatula, that has been wetted, to fold the dough (one can also use one’s wetted fingers). I always make two folds in the opposite direction for each time (like folding an envelope). The next hour I will fold in 90 degrees different direction
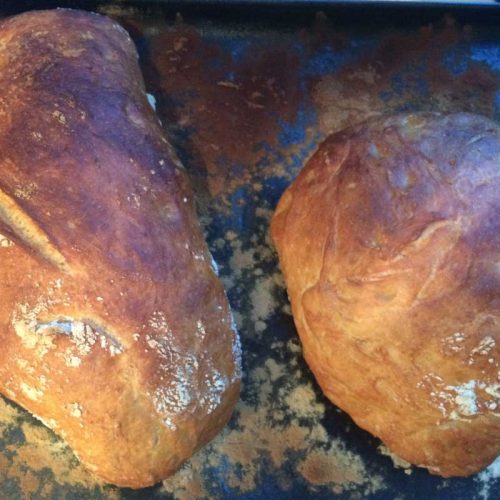
- After doing this each hour for 3 hrs, we take the dough and carefully divide it with the wetted spatula in two parts and transfer it to a baking tray, trying not to squeeze the gas out of the dough. The dough, covered with the wrap, is further proofed at 25-30 C to rise while the oven is pre-heated to 270 C

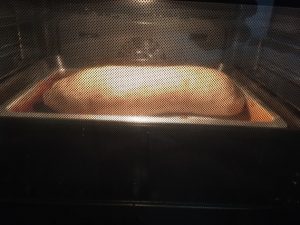
- When the dough volume has risen some 50% further (some 30 min), the oven thermostat is turned down to 230 C, the plastic wrap carefully removed and the proofed dough is placed on a sheet or baking stone in the middle of the still very hot oven
- Immediately thereafter some steam or 200 ml hot water is inserted into the very hot oven, carefully avoiding to hit the dough (and the baker). If you use hot water, close the oven immediately to prevent steam burns. In the next several minutes the bread will still further rise (oven spring)
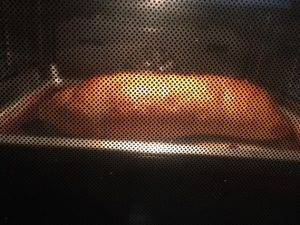
- Bake for 45 minutes at 230 C, carefully checking that the top of the bread does not get black.
Notes
Food allergy & intolerance information: gluten
Remarks
- If the very strong (high gluten) flour is not available, the bread will become flatter, but the taste is still superb. Additional gluten could also be added to the flour if the very strong flour is not available.
- A high pre-heated oven temperature will help to create more oven spring.